No products in the basket.
Guides
BROTHER SCAN AND CUT SETTINGS
SCAN AND CUT SETTINGS
The settings below are for the BROTHER SCAN AND CUT based on the CM900 model, all the various models do vary in strength and each model will vary slightly from the guidance below, please ensure you use a test cut when using these, or any new material before using it for the first time, so you may check that the settings guidance below work with your machine. The guidance below also expects that you have checked the blade sticker label alignment and information can be found at the very bottom of the page regarding this for clarification.
The onboard software offers you a test feature or you can use a small hexagon about the size of a 5 pence piece. Test the cut. If it cuts too deep please reduce the blade depth. If it doesn’t cut enough please increase the blade depth and cut again, repeating the process if needed. It is okay to change the blade a few times, as all machines vary slightly due to many variables affecting calibration. Please see how to test cut at the bottom of the page, full instructions provided below.
When using these cut settings it is worth bearing in mind the type of vinyl you are using, as some is more suited to fine, intricate detail; please see product descriptions on the website for each vinyl’s capability. If the test cut works well and the design you are using struggles it may be worth adding an offset line to widen it. Settings below are made with the standard blade and may vary if the blade is well used, chipped or if a new or different blade is used so please always test cut if in doubt, or if a previous setting that had worked doesn’t please re start the test cut process before wasting any product.
All settings below require you to cut with speed set at 1 and pressure set at 0 with only 1 pass unless specified differently. The only change I would suggest you make if the setting below doesn’t work is the blade depth and only change in increments on .25 or a 1/4 of a movement so 1 to 1.25 or 1 and a quarter of the way to the next and so on. Test and repeat moving blade depth up or down until desired cut is found. Whilst pressure can be altered , we have the settings recommended below to extend your blade’s lifespan and excessive pressure can dull or chip your blade. Speed is set as below, to reduce ripping and tearing and ideally should not be altered either.
We always suggest peeling the corner of the sheet of vinyl to check which side has the clear carrier (or paper sheet if self adhesive) which corner side has the vinyl. The clear side always goes to the mat and the vinyl side faces up.
SELF ADHESIVE VINYL
Click on the green Product name to be taken to it’s page.
Pattern Vinyl Cut setting – Blade- 1.75 Speed- 1 Pressure-0 Passes- 1
Pattern Glitter Vinyl Cut setting – Blade- 2.75 Speed- 1 Pressure-0 Passes- 1
Metallic Vinyl– Cut setting – Blade- 2 Speed- 1 Pressure-0 Passes- 1
Holographic Vinyl Cut setting – Blade- 2 Speed- 1 Pressure-0 Passes- 1
Prime Vinyl Cut setting – Blade- 1.75 Speed- 1 Pressure-0 Passes- 1
Gloss Vinyl Cut setting – Blade- 1.75 Speed- 1 Pressure-0 Passes- 1
Matt Vinyl Cut setting – Blade- 1.75 Speed- 1 Pressure-0 Passes- 1
GM Premium Glitter Vinyl Cut setting – Blade- 2.75 Speed- 1 Pressure-0 Passes- 1
Gemstone Glitter Vinyl Cut setting – Blade- 2.75 Speed- 1 Pressure-0 Passes- 1
Stained Glass Vinyl Cut setting -Blade- 1.5 Speed- 1 Pressure-0 Passes- 1
Glass Etch Vinyl Cut setting – Blade- 1.75 Speed- 1 Pressure-0 Passes- 1
Fluorescent Vinyl Cut setting -Blade- 1.5 Speed- 1 Pressure-0 Passes- 1
Blackboard Vinyl Cut setting -Blade- 2.25 Speed- 1 Pressure-0 Passes- 1
Paint mask Vinyl Cut setting – Blade- 1.5 Speed- 1 Pressure-0 Passes- 1
Rose Gold Vinyl Cut setting – Blade- 2 Speed- 1 Pressure-0 Passes- 1
Pastel Vinyl Cut setting – Blade- 1.75 Speed- 1 Pressure-0 Passes- 1
Oracal 651 Cut setting -Blade- 2 Speed- 1 Pressure-0 Passes- 1
Oracal 638 Vinyl Cut setting -Blade- 1.5 Speed- 1 Pressure-0 Passes- 1
Ri-defend Vinyl Cut setting -Blade- 1 Speed- 1 Pressure-0 Passes- 1
Sand blasting Cut setting –Blade– 3.25 Speed- 1 Pressure-0 Passes- 1
Glow in the dark Vinyl Cut setting –Blade– 3.25 Speed- 1 Pressure-0 Passes- 1
GM Chameleon vinyl Cut setting – Blade- 2 Speed- 1 Pressure-0 Passes- 1
GM Fantasy Vinyl–Cut setting – Blade- 2 Speed- 1 Pressure-0 Passes- 1
GM Crafty Vinyl Cut setting – Blade- 2.75 Speed- 1 Pressure-0 Passes- 1
CARDSTOCK
Click on the green Product name to be taken to it’s page.
Glitter A4 card, Solid core, Linen, Pastel, Mirror, Speciality, Gloss and Satin Gm Crafts A4 cardstock Cut setting -Blade- 5 Speed- 1 Pressure-0 Passes- 1
GMS A4 Craft card Cut setting -Blade- 3.75 Speed- 1 Pressure-0 Passes- 1
Transfer Adhesive Roll or A4 Sheets
Cut setting -Blade– 1 Speed- 1 Pressure-0 Passes- 1
A4 INKJET / LASER PRINTABLE SELF ADHESIVE
Gloss/Matt Filmic
Cut setting -Blade- 1.5 Speed- 1 Pressure-0 Passes- 1
All paper sheets including Kraft
Cut setting -Blade– 1 Speed- 1 Pressure-0 Passes- 1
Magnetic Sheets
Cut setting – Printable magnetic sheets , Pressure setting- Default
Cut setting -Blade- 5 Speed- 1 Pressure-0 Passes- 2
HEAT TRANSFER VINYL
Click on the green Product name to be taken to it’s page.
GM Premium Plus Vinyl Cut setting – Blade- 1.75 Speed- 1 Pressure-0 Passes- 1
GM Pattern Pearl Sparkle- Vinyl Cut setting – Blade- 1.75 Speed- 1 Pressure-0 Passes- 1
GM Pearl Sparkle Vinyl Cut setting – Blade- 1.75 Speed- 1 Pressure-0 Passes- 1
*** Pattern Vinyl Cut setting -Blade- 1.75 Speed- 1 Pressure-0 Passes- 1***
***Pattern glitter Vinyl Cut setting – Blade- 3.75 Speed- 1 Pressure-0 Passes- 1***
Eco press Vinyl Cut setting – Blade- 1.75 Speed- 1 Pressure-0 Passes- 1
Eco press Vented Vinyl Cut setting -Blade- 1.75 Speed- 1 Pressure-0 Passes- 1
GM Bubble up Vinyl Cut setting – Blade- 3.5 Speed- 1 Pressure-0 Passes- 1
GM Chameleon Vinyl Cut setting – Blade- 2.5 Speed- 1 Pressure-0 Passes- 1
GM Glitter Vinyl Cut setting – Blade- 3.75 Speed- 1 Pressure-0 Passes- 1
GM Glitter Vented Cut setting – Blade- 3.75 Speed- 1 Pressure-0 Passes- 1
GM Chrome Vinyl Cut setting -Blade- 2.5 Speed- 1 Pressure-0 Passes- 1
GM Light Active Vinyl On the computer Cut setting – Blade- 2.25 Speed- 1 Pressure-0 Passes- 1
GM Reflective Vinyl On the computer Cut setting – Blade- 2.25 Speed- 1 Pressure-0 Passes- 1
GM Glow in the dark Vinyl Cut setting -Blade- 2.5 Speed- 1 Pressure-0 Passes- 1
GM Heat Active Vinyl Cut setting -Blade- 2.25 Speed- 1 Pressure-0 Passes- 1
GM Brushed Vinyl Cut setting – Blade- 6 Speed- 1 Pressure-0 Passes- 1
*** Pastel matt Vinyl Cut setting – Blade- 1.75 Speed- 1 Pressure-0 Passes- 1***
***Pastel glitter Vinyl Cut setting – Blade- 3.75 Speed- 1 Pressure-0 Passes- 1***
GM Turbo Vinyl Cut setting – Blade- 1.75 Speed- 1 Pressure-0 Passes- 1
GM Stretch Vinyl Cut setting – Blade- 2 Speed- 1 Pressure-0 Passes- 1
Premium- Cut setting – Blade- 1.75 Speed- 1 Pressure-0 Passes- 1
Holographic Vinyl Cut setting -Blade- 2 Speed- 1 Pressure-0 Passes- 1
Flock Vinyl Cut setting – Blade- 3.25 Speed- 1 Pressure-0 Passes- 1
Metallic Stretch Vinyl Cut setting – Blade- 1.75 Speed- 1 Pressure-0 Passes- 1
GM Pearlshine Vinyl Cut setting – Blade- 2.25 Speed- 1 Pressure-0 Passes- 1
GM High Gloss Vinyl- Cut setting – Blade- 1.75 Speed- 1 Pressure-0 Passes- 1
GM Holoshine Vinyl- Cut setting – Blade- 2.5 Speed- 1 Pressure-0 Passes- 1
GM Brick Vinyl— Cut setting Blade- 3.5 Speed- 1 Pressure-0 Passes- 1
*** (not advisable for very thin fonts or fine lines or details you need to keep in place as pastel, printed or pastel glitter may lift off due to being produced and cut by you on a static backing sheet as needs to be transferred to application tape after cutting.)***
DARK Cut setting –Blade- 1.25 Speed- 1 Pressure-0 Passes- 1
LIGHT Cut setting –Blade- .75 Speed- 1 Pressure-0 Passes- 1
How to Improve Cut Quality with a Test Cut
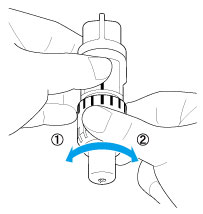
Adjust the blade extension according to the material, and then use the same material to be used in your project to perform trial cutting.
- Adjust the blade extension.
(1) Turn to the left to decrease the blade extension.
(2) Turn to the right to increase the blade extension. - Turn on the machine.
- Insert the holder appropriate for the material into the carriage of the machine.
- Select “Pattern” in the home screen.
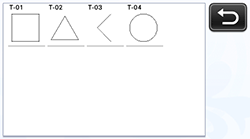
- Touch the “Test” key in the pattern category selection screen.
- Select a pattern in the pattern selection screen.
- Touch the “Set” key.
- Check the pattern arrangement, and then touch the “OK” key.
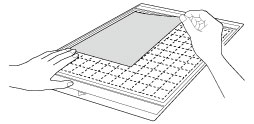
- Firmly attach the material that will be cut to the mat.
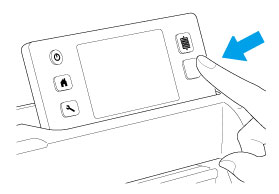
- While holding the mat level and lightly inserting it into the feed slot, press
in the operation panel.Lightly insert the mat so that it aligns with the guides on the left and right sides of the feed slot and is tucked under the feed rollers.
(1) Guides (2) Feed rollers
The mat is fed in to complete the preparations for cutting.
- Select “Cut” in the draw/cut selection screen.
- Touch
or press
in the operation panel, and then display “Cut Speed” and “Cut Pressure” in the settings screen to adjust the cutting speed and pressure according to the material to be cut.
Depending on the material being used, it may not be cut cleanly if the cutting pressure is not correctly adjusted.
- Press the “Start/Stop” button to start cutting.
When cutting is finished, the message “Finished cutting.” appears on the display.
Touch the “OK” key to return to the draw/cut selection screen.
BLADE LABEL ADJUSTMENT
Can you see the picture below, you will notice how none of the blade adjustment number settings are in the same place.
This will affect the results you get if you are following our settings guide, this is because when the blade carriage is put to its highest setting, which is 12, the mark above the twelve should line up with the mark just below the Brother logo. You can clearly see on the middle one above that it is WAY off.
This is simply fixed by turning the blade holder until there is no gap between the top and bottom half and the carefully peel off the sticker with all of the numbers on, reposition it so that the mark above the 12 lines up with the line below the Brother logo and then stick it back down.


 in the operation panel.Lightly insert the mat so that it aligns with the guides on the left and right sides of the feed slot and is tucked under the feed rollers.


 in the operation panel, and then display “Cut Speed” and “Cut Pressure” in the settings screen to adjust the cutting speed and pressure according to the material to be cut.
 When cutting is finished, the message “Finished cutting.” appears on the display.