No products in the basket.
Guides
SILHOUETTE CAMEO 4 CUT SETTINGS
SILHOUETTE CAMEO 4 CUT SETTINGS
Please Test cut as described in the following information when using a new product. We would love to see what you make! Have you found our You Tube channel yet? There is lots of videos showing tutorials available on there, as well as exclusive demos, inspiration and more! Join us for more inspiration on Facebook , Instagram or Tiktok or send us an email to [email protected] we would love to hear from you!
The settings below are for the Silhouette Cameo 4 . Please ensure you use a test cut on any new vinyl before using it for the first time, so you may check that the settings below work with your machine. The software offers you a test feature or you can use a small hexagon about the size of a 5 pence piece. Test the cut. If it cuts too deep please reduce the force. If it doesn’t cut enough please increase the force and cut again, repeating the process if needed. It is okay to change the force a few times, as all machines vary slightly due to many variables effecting calibration. Please see how to test cut at the bottom of the page, full instructions provided below.
When using these cut settings it is worth bearing in mind the type of vinyl you are using, as some is more suited to fine, intricate detail; please see product descriptions for each vinyl’s capability. If the test cut works well and the design you are using struggles it may be worth adding an offset line to widen it. Settings below are made with the Auto blade and may vary if the blade is well used, chipped or if a new or different blade, eg ratchet is used so please test cut if in doubt before wasting any product. Please note that the blue/green dot in your blade holder should be visible and the clamp fully pressed in and clicked closed. Please be aware Silhouette can alter pre set settings when doing an update, so if a previous setting stops working and you have checked your blade for damage, then do repeat test cuts increasing Force and if needed blade depth until you have found the new setting you need.
Whilst force can be altered , we have the settings recommended below to extend your blade’s lifespan and excessive pressure can dull or chip your blade. Speed is set as below, to reduce ripping and tearing and ideally should not be altered either.
We always suggest peeling the corner of the sheet of vinyl to check which side has the clear carrier (or paper sheet if self adhesive) and which corner side has the vinyl. The clear side always goes to the mat and the vinyl side faces up.
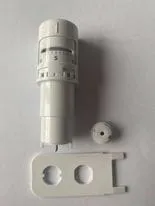
If you are having cutting issues, please check your blade, unscrew the cap and photograph the tip shown as below so you can zoom in to check for damage.
SELF ADHESIVE VINYL
Click on the green Product name to be taken to it’s page.
Pattern Vinyl— On the computer Cut setting – Vinyl Matte Blade- 1 Speed- 5 Force-8 Passes- 1
Pattern Glitter Vinyl On the computer Cut setting – Vinyl Glitter Blade- 2 Speed- 5 Force- 12 Passes- 1
Metallic Vinyl– On the computer Cut setting – Vinyl Metallic Blade- 2 Speed- 5 Force- 10 Passes- 1
Holographic Vinyl On the computer Cut setting – Vinyl Glitter Blade- 2 Speed- 5 Force- 10 Passes- 1
Prime Vinyl On the computer Cut setting – Vinyl Glossy Blade- 1 Speed- 5 Force-10 Passes-1
Gloss Vinyl On the computer Cut setting – Vinyl Glossy Blade- 1 Speed- 5 Force- 8 Passes-1
Matt Vinyl On the computer Cut setting – Vinyl matte Blade- 1 Speed- 5 Force- 8 Passes-1
GM Premium Glitter Vinyl On the computer Cut setting – Vinyl Glitter Blade- 2 Speed- 5 Force- 12 Passes- 1
Gemstone Glitter Vinyl On the computer Cut setting – Vinyl Glitter Blade- 2 Speed- 5 Force- 10 Passes- 1
Stained Glass Vinyl On the computer Cut setting –Vinyl Glossy Blade- 1 Speed- 5 Force-8 Passes-1
Glass Etch Vinyl— On the computer Cut setting – Vinyl matte Blade- 1 Speed- 5 Force- 10 Passes-1
Fluorescent Vinyl On the computer Cut setting –Vinyl Glossy Blade- 1 Speed- 5 Force-10 Passes-1
Blackboard Vinyl On the computer Cut setting –Vinyl Matte Blade- 1 Speed- 4 Force- 31 Passes- 1
Paint mask Vinyl On the computer Cut setting – Vinyl Frosted Blade- 1 Speed- 5 Force- 7 Passes– 1
Rose Gold Vinyl—On the computer Cut setting – Vinyl Metallic Blade- 1 Speed- 5 Force- 14 Passes- 1
Pastel Vinyl– On the computer Cut setting – Vinyl Matte Blade- 1 Speed- 5 Force-8 Passes- 1
Oracal 651 Vinyl On the computer Cut setting –Vinyl Glossy Blade- 1 Speed- 5 Force-11 Passes-1
Oracal 638 On the computer Cut setting –Vinyl Matte Blade- 1 Speed- 5 Force-10 Passes-1
Sand blasting On the computer Cut setting –Cardstock Plain Blade- 4 Speed- 4 Force-31 Passes-1
Glow in the dark Vinyl On the computer Cut setting –Cardstock Plain Blade- 4 Speed- 4 Force-28 Passes-1
Ri-defend Vinyl On the computer Cut setting –Vinyl Glossy Blade- 1 Speed- 5 Force-8 Passes-1
GM Chameleon vinyl— On the computer Cut setting – Vinyl Metallic Blade- 2 Speed- 5 Force- 10 Passes- 1
GM Fantasy Vinyl– On the computer Cut setting – Vinyl GlitterBlade-2 Speed– 5 Force– 10Passes– 1
GM Crafty Vinyl (WITHOUT THE MAT) -On the computer Cut setting – Vinyl Metallic Blade- 4 Speed- 5 Force-10 Passes-1
Transfer Adhesive Roll or A4 Sheets- Cut Setting Washi sheets Blade- 1 Speed- 5 Force-15 Passes-1
CARDSTOCK
Click on the green Product name to be taken to it’s page.
Glitter A4 card, Solid core, Linen, Pastel, Mirror, Speciality, Gloss and Satin Gm Crafts A4 cardstock On the computer Cut setting – Glitter Card Blade- 3 Speed- 3 Force-25 Passes-2
GMS A4 Craft card On the computer Cut setting –Cardstock plain Blade- 4 Speed- 4 Force-14 Passes-1
A4 INKJET / LASER PRINTABLE SELF ADHESIVE
Gloss/Matt Filmic
On the computer Cut setting –Washi sheets Blade- 1 Speed- 5 Force-20 Passes-1
All paper sheets including Kraft
On the computer Cut setting –Washi sheets Blade- 1 Speed- 5 Force-15 Passes-1
Magnetic Sheets
On the computer Cut setting –Magnetic Paper printable Blade- 4 Speed- 5 Force-15 Passes-1
HEAT TRANSFER VINYL
GM Premium Plus On the computer Cut setting – Heat Transfer Iridescent Blade- 2 Speed- 5 Force- 7 Passes-1
GM Pattern Pearl Sparkle- On the computer Cut setting – Heat Transfer Iridescent Blade- 2 Speed- 5 Force- 7 Passes-1
GM Pearl Sparkle On the computer Cut setting – Heat Transfer Iridescent Blade- 2 Speed- 5 Force- 7 Passes-1
*** Pattern Vinyl On the computer Cut setting – Heat transfer smooth Blade- 2 Speed- 6 Force- 4 Passes- 1***
***Pattern glitter Vinyl On the computer Cut setting – Heat Transfer Glitter Blade- 4 Speed- 5 Force- 21 Passes-1***
Eco press Vinyl On the computer Cut setting – Heat Transfer Iridescent Blade- 2 Speed- 6 Force- 7 Passes-1
Eco press Vented On the computer Cut setting –Heat Transfer Iridescent Blade- 2 Speed- 6 Force- 8 Passes-1
GM Bubble up Vinyl On the computer Cut setting – Heat Transfer Glow in the dark Blade- 2 Speed- 6 Force-7 Passes-1
GM Chameleon Vinyl On the computer Cut setting – Heat Transfer Iridescent Blade- 2 Speed- 5 Force- 8 Passes-1
GM Glitter Vinyl On the computer Cut setting – Heat Transfer Glitter Blade-4 Speed- 5 Force- 21 Passes-1
GM Glitter Vented Vinyl On the computer Cut setting – Heat Transfer Glitter Blade-4 Speed- 5 Force- 21 Passes-1
GM Chrome Vinyl On the computer Cut setting –Heat Transfer Iridescent Blade- 2 Speed- 5 Force- 8 Passes-1
GM Light Active Vinyl On the computer Cut setting – Heat Transfer Iridescent Blade- 2 Speed- 6 Force-8 Passes-1
GM Reflective Vinyl On the computer Cut setting – Heat Transfer Iridescent Blade- 2 Speed- 5 Force-8 Passes-1
GM Glow in the dark Vinyl On the computer Cut setting –Heat Transfer Glow in the dark Blade- 2 Speed- 6 Force-7 Passes-1
GM Heat Active Vinyl On the computer Cut setting –Heat Transfer Iridescent Blade- 2 Speed- 5 Force- 6 Passes-1
GM Brushed Vinyl On the computer Cut setting – Heat Transfer Glitter Blade- 5 Speed-5 Force- 20 Passes-1
*** Pastel matt Vinyl— On the computer Cut setting – Heat Transfer Iridescent Blade- 2 Speed- 6 Force- 8 Passes-1***
***Pastel glitter Vinyl On the computer Cut setting – Heat Transfer Glitter Blade- 4 Speed- 5 Force- 21 Passes-1***
GM Turbo Vinyl On the computer Cut setting – Heat Transfer Iridescent Blade- 2 Speed- 5 Force- 6 Passes-1
GM Stretch Vinyl— On the computer Cut setting – Heat Transfer Iridescent Blade- 2 Speed- 5 Force- 6 Passes-1
Premium- On the computer Cut setting – Heat Transfer Iridescent Blade- 2 Speed- 5 Force- 7 Passes-1
Holographic Vinyl On the computer Cut setting –Heat Transfer Iridescent Blade- 2 Speed- 5 Force-20 Passes-1
Flock Vinyl On the computer Cut setting –Heat Transfer Glitter Blade- 4 Speed- 5 Force- 21 Passes-1
Metallic Stretch Vinyl— On the computer Cut setting – Heat Transfer Iridescent Blade- 2 Speed- 6 Force- 6 Passes-1
GM Pearlshine Vinyl On the computer Cut setting – Heat Transfer Glow in the dark Blade- 2 Speed- 6 Force-6 Passes-1
GM Holoshine Vinyl- On the computer Cut setting – Heat Transfer Glitter Blade- 5 Speed-5 Force- 20 Passes-1
GM High Gloss Vinyl- On the computer Cut setting – Heat transfer smooth Blade- 2 Speed- 6 Force- 5 Passes- 1
GM Brick Vinyl On the computer Cut setting – Heat Transfer Glitter Blade- 6 Speed-5 Force- 24 Passes-1
*** (not advisable for very thin fonts or fine lines or details you need to keep in place as pastel, printed or pastel glitter may lift off due to being produced and cut by you on a static backing sheet as needs to be transferred to application tape after cutting.)
DARK
On the computer Cut setting –Washi sheets Blade- 1 Speed- 5 Force-10 Passes-1
LIGHT
On the computer Cut setting –Washi sheets Blade- 1 Speed- 5 Force-7 Passes-1
How to Improve Cut Quality with a Test Cut
The Test Cut feature is a great tool to help fine tune your cut settings and improve your overall cut quality. With this handy feature you can find the right settings to cleanly cut all the different materials you want to try.
What is a Test Cut?
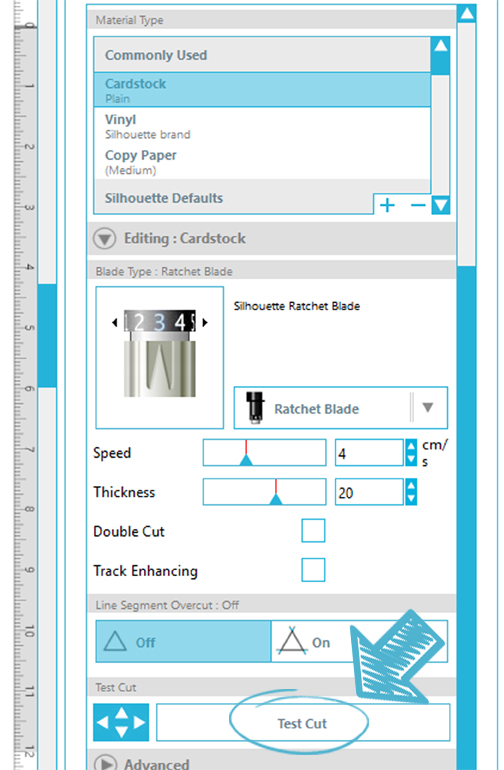
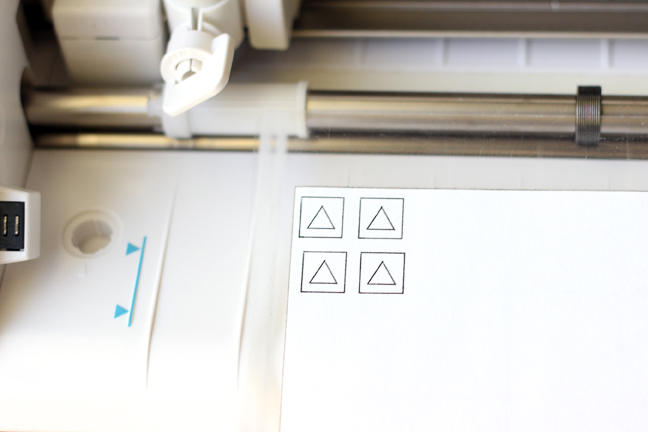
The Test Cut is an option in the Cut Settings panel. Once you have selected a material and adjusted your blade to the suggested depth for that material, you have the option to perform a Test Cut. Your Silhouette machine will cut a square with a triangle inside, using your chosen settings.
You may need to click on the material and scroll down to see the “Test Cut” button below the cut settings of blade, speed, thickness, etc.
The purpose of a test cut is to check whether the settings you have chosen for a specific material are appropriate. If the test cut doesn’t cut all the way through or doesn’t cut cleanly, then you know you should alter the Force. If the force is at the maximum of 33 and you need to increase it more, take the blade depth up to the next one but decrease the force back to 2 or 3 and start at a lower force.
How do I move the Test Cut?
If you simply load your mat or material and click on the “Test Cut” button as shown above, the cut will be made at the upper left corner of your media, right where the blade is positioned.
But what if the test cut fails?
If it doesn’t cut all the way through or doesn’t cut cleanly, you need to adjust your settings and test cut again. Do not perform a test cut in the same place as before.
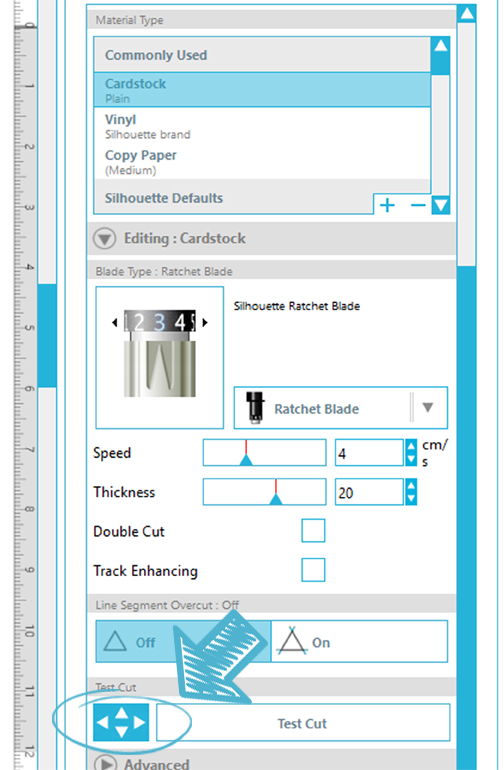
Depending on your machine, there are various ways to move the test cut. This will move the actual blade holder of your machine.
- Use the arrows in the software, just to the left of the “Test Cut” button. This is the only way to move the test cut on the Portrait or Curio.
Note: See our tutorial on the deep cut blade for more helpful information on test cuts with Curio.
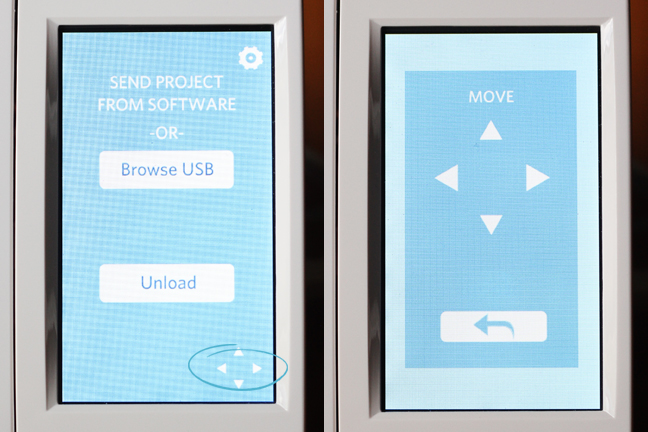
- Use the arrows on the touchscreen of the CAMEO 2 or CAMEO 3. Unload the mat, then load again. You can press on the small arrows icon of the main screen to access the touchscreen arrows.
- Use the physical arrow buttons on the original CAMEO machine.
Where do I position a new Test Cut?
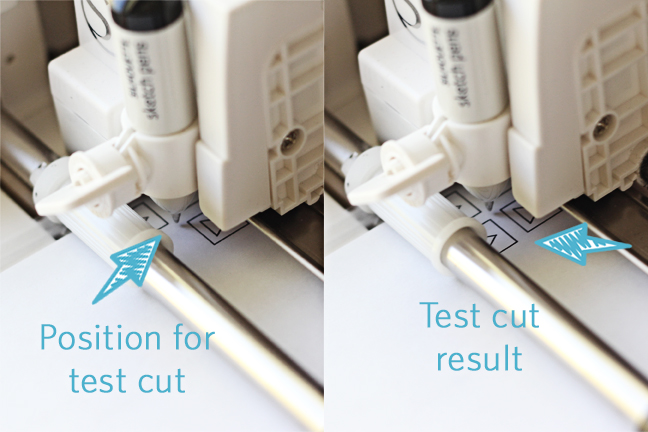
- To find a clean spot for subsequent test cuts, simply reposition the blade so it is to the right of or below any other cutouts. (See photo below.)
- The position of the blade will become the upper left corner of the test cut square. Technically, it will actually cut a millimeter or two further right and down of the exact blade position.
- Be sure to position the test cut so it won’t interfere with the layout of your actual project. You don’t want little squares missing from your final design!
- You will need about a half inch of clear space for the test cut.
For illustration purposes, I’ve used a sketch pen in the photos below. You can see I positioned my blade/pen to the right and underneath previous test cuts. The resulting test cut has plenty of room.
Note: See our tutorial on the deep cut blade for more helpful information on test cuts with Curio.
Write down your successful Test Cut settings!
When you find a good setting combination for a certain material, record your successful result—record the blade depth, speed, thickness, and whether to use the double-cut feature or not.
A few helpful tips:
- Use a sticky note and attach it to the pack of paper
- Keep a spreadsheet of successful settings for your machine
- Add a custom setting for new materials in the Cut Settings Window by clicking on the “+” sign, typing in the material type, and using your mouse to change blade/speed/thickness
How can Test Cuts help me?
If you are willing to do a little experimenting, you can really dial in great cut settings for materials that may not cut perfectly for you on the default settings.
Test it, tweak the settings, test again.
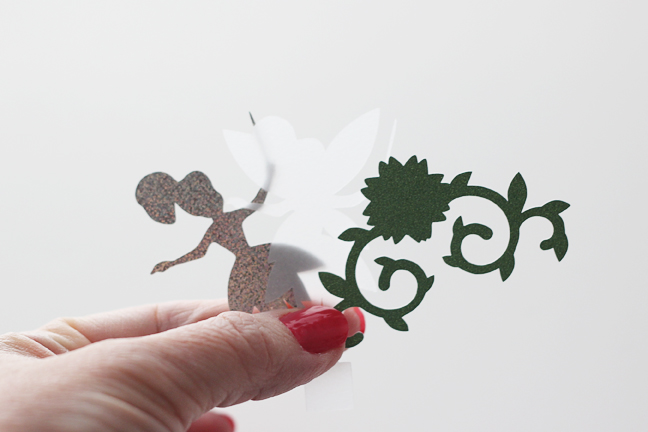
You can also gain confidence in trying new materials that are not in your default list. For example, look at the fairy project below; using thin glitter card stock, clear presentation covers, and holographic paper. Look at these intricate cuts!
Green fairy in a bottle (design ID #140636)
None of the materials mentioned above are in the Silhouette Studio® default list, and sometimes you might even find that the default settings don’t work for the specific materials you’re using. (For example, the default vellum settings were way off for me.) But multiple test cuts get your settings where they needed to be without wasting a lot of specialty paper.


